By Jane Lake
If made with Christmas cards and tied up with Christmas ribbon, these tiny boxes make neat tree trims for holding little surprises – although they would be good for Easter or other occasions as well.
I’ve made them into a join-the-dots craft, so there’s no measuring involved – just print out the template, transfer 12 dots for each square pattern piece, join them as instructed and away you go – just follow the rest of the instructions and you’ll be making recycled greeting cards into gift boxes in no time!
Craft Supplies
- greeting cards (thin card stock or stiff paper can also be used)
- ruler
- scissors
- pencil
- white glue (optional)
- glitter, ribbon, rick-rack or other embellishments (optional)
Greeting Card Box Instructions
Note: This project is more difficult to explain than it is to do; once you have made one box, the next ones will go together more quickly and easily.
First print out the full size square pattern. You can use the pattern many times as you don’t need to cut it.
How to Make a Paper Box
Video Instructions
Some of you may find these video instructions useful for making larger paper boxes from recycled calendars, catalogs or gift wrap.
 The technique is essentially the same and the video instructions provide a clear picture of each step.
The smaller pattern is the bottom of the box, using the back page of the greeting card. Don’t worry about a verse or two, or any other small amount of printing; usually it’s invisible when the box is folded up.
The larger pattern makes the box top. There are fold lines indicated, and two cut lines – you will assemble both the top and the bottom of the box in exactly the same way.
Begin by placing the pattern on the back of your card. For the top of the box, try to position it so that the most colorful or interesting scene of the card front will be centered in the middle of the pattern.
Working on the back, transfer 12 dots, as shown on the pattern, to your card. Place 4 dots at each corner of the square, and two more on each side, where indicated.
 Now join the dots, copying the pattern. It isn’t necessary to draw coloured lines; the colours are only to help with the instructions for the box — you’ll find, when you’re done, that it sounds much more complicated than it is!
Next, cut into your card template where indicated on the pattern by the green lines.
It’s time to start folding. Work from the blank side of the card, which will be the inside of your box. Begin by folding the four corner triangles outwards, so you’re folding toward the printed side of the card.
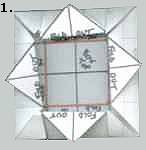
Figure 1
Now take a box side and fold it in half to crease it so the green corner line will meet the red line of the inside square, as shown on the paper template. Repeat with the other sides. See Figure 1.
Figure 2
On the two longer sections, you will need to fold in the ends, as shown in Figure 2. These form two flaps which hold the box together in the last step.
 Figure 3
Fold up the sides to form your box.
Figure 4
Last step is to fold the straight sides over the flaps that were made in Figure 2. Push all the triangular ends into place at the bottom of the box. Usually no glue is required to keep the box together, however if you find the folds coming open, use a small dab of glue to fasten in place.
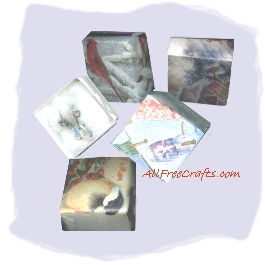
Use the same method to make the box bottom and the box top. You will find the top fits over the bottom fairly snugly, so the box when assembled does not fall apart.
Now you have made a tiny treasure box from a recycled greeting card. These are suitable in size to hold small treats, a few coins, candy, earrings or other small gifts.
For Halloween, add treat gifts or a small assortment of stickers, an eraser, pencil sharpener etc.
And for Christmas, embellish with thin ribbon and hang from your Christmas tree as ornaments to be opened on Christmas Day. They can also be added to wreaths, table settings etc. as a colourful little addition that holds a nice surprise.
Share this Post
latest blog posts
-

-
-

-
 Christmas cards offers November 9, 2023
 -
 CVS Christmas card November 5, 2023
 -
 Christmas cards Making November 1, 2023
 -
 Make your own Love cards October 28, 2023
 -
 Cards from October 24, 2023
 -
 American Greetings Boxed Christmas cards October 20, 2023
 -
 Make your own Valentine cards online free October 16, 2023
 -
 Print your own Christmas cards October 12, 2023
 -
 Card companies online October 8, 2023